Hey All! I hope your weekend is good so far. To update you on the front door, I have two coats on it so far, but I need to do at least some touch up after it dries before the big reveal. My front door has 9 window panes (To tape off the windows on both sides of the door, I had to use 72 pieces of tape!), and I want to hang a small curtain in this windowed area for privacy. The glass is not frosted or anything so people can basically see straight in otherwise. So, I am not sure if I will post photos tomorrow or I will wait till next weekend, when I hope to have my mama's help sewing a curtain to hang there.
That being said, I did work on another really easy DIY project today: Twine on Painted Canvas. I didn't really see this anywhere, but I was inspired by several ideas of people using wooden letters or stencils on canvas to have a very simple but pretty piece of wall art. I have needed a small piece of art for my powder bathroom for some time now, and I decided to use this idea in that bathroom. The basic idea: paint a canvas a solid color and use glue to create a design with twine on top of the background color. I will tell you what I did, and then I will tell you what I liked and didn't like about it.
Step 1: Get your supplies together.
You will need a canvas, two colors of paint (a solid of your choice and a tan or gold to coordinate with the twine), paintbrushes, twine, scissors, hot glue gun, and hot glue sticks.


Step 2: Paint your canvas with your paint of choice I used a light blue acrylic paint that coordinated with accents in my powder bath. I needed two coats for good coverage.

Step 3: Choose a design for your twine. I was inspired by this image.
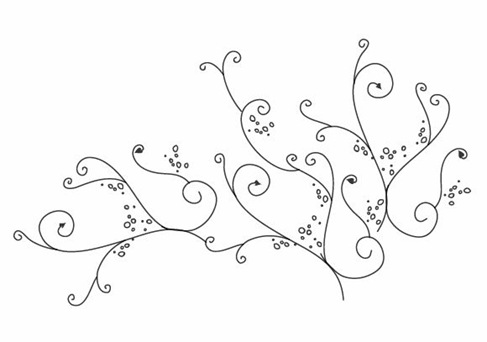
Step 4: (I did not do this and regret it.) After letting your paint dry, VERY LIGHTLY trace your design in pencil onto your canvas.
Step 5: Let your hot glue gun heat up as you cut your first few pieces of twine. I cut my twine as I went because I was only loosely following the design from the image above.


Step 6: Trace over your pencil with the hot glue gun, affixing small lengths of the twine at a time.

Step 7: After gluing down all of my twine, I took a moment to trim up any wild strings from the twine and from the hot glue to "clean it up" a bit.

Step 8: Paint the edges of the canvas with a gold or tan to coordinate with the twine (I used gold.)
You have an easy to do piece of art!


Okay, so, I have to say there were some pro's and con's to this project.
Pros: Quick, easy, uses products most crafters already have at home
Cons: Can take patience and care to get a "clean" look
To have a nice clean look (cleaner than mine), I recommend tracing your design on the canvas first. I also recommend being especially careful to use as little glue as possible as your trace your lines. Do not use big globs. You don't want to see the shiny glue after it is completed. I had like three places I had to pull off and review. It was kind of a pain to have to do this, but it could have been avoided if I had realized how important it was earlier to not get "globs."
If you modify this idea or have another idea like it, let me know! I liked this project, but I think it could have turned out better if I had done a few of the recommendations I gave here.