Pages

Saturday, October 1, 2011

Teaching is a lot of work, who knew?

Wow, It has been about two weeks since I updated my blog!  I have been completely caught up in teaching... 24-7.  I sleep, I go to work, I teach, I go to meetings, I go home, I grade, I eat, I call parents, I sleep again!  Don't get me wrong, it has been rewarding and I even enjoy doing it, but I have also been... tired.  It is one thing to hear people tell you teaching is a difficult career field, and it is another thing to actually experience it yourself.  It's just hard and hard work and emotionally draining sometimes, too.  I almost always go home thinking, "Wow, that was fun.  I want to do that again tomorrow," but it has also been hard to have to push anything else aside the last two weeks just to keep up.  I think things are going to slow down a little.  I will try to enjoy it while it lasts and try to update this a little more often, too.

Friend Green Tomatoes... Making me hungry!
That being said, I am part of a really neat blog carnival all about Home Life.  If you want to read some really great blogs about home life just go here: http://www.homelifeweekly.com/carnival/home-life-carnival-september-2/

My favorite article is about Fried Green Tomatoes... yum!


Expect a post more about my home organization binder this weekend.


Saturday, September 17, 2011

DIY Art: Twine on Painted Canvas

Hey All!  I hope your weekend is good so far.  To update you on the front door, I have two coats on it so far, but I need to do at least some touch up after it dries before the big reveal.  My front door has 9 window panes (To tape off the windows on both sides of the door, I had to use 72 pieces of tape!), and I want to hang a small curtain in this windowed area for privacy.  The glass is not frosted or anything so people can basically see straight in otherwise.  So, I am not sure if I will post photos tomorrow or I will wait till next weekend, when I hope to have my mama's help sewing a curtain to hang there.

That being said, I did work on another really easy DIY project today: Twine on Painted Canvas.  I didn't really see this anywhere, but I was inspired by several ideas of people using wooden letters or stencils on canvas to have a very simple but pretty piece of wall art.  I have needed a small piece of art for my powder bathroom for some time now, and I decided to use this idea in that bathroom.  The basic idea: paint a canvas a solid color and use glue to create a design with twine on top of the background color.  I will tell you what I did, and then I will tell you what I liked and didn't like about it.

Step 1: Get your supplies together.
You will need a canvas, two colors of paint (a solid of your choice and a tan or gold to coordinate with the twine), paintbrushes, twine, scissors, hot glue gun, and hot glue sticks.

Step 2: Paint your canvas with your paint of choice I used a light blue acrylic paint that coordinated with accents in my powder bath.  I needed two coats for good coverage.
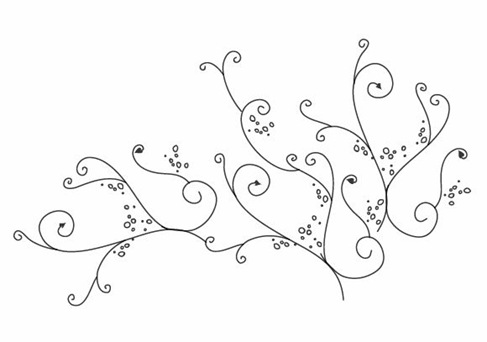
Step 3: Choose a design for your twine.  I was inspired by this image.


Step 4: (I did not do this and regret it.)  After letting your paint dry, VERY LIGHTLY trace your design in pencil onto your canvas.
Step 5: Let your hot glue gun heat up as you cut your first few pieces of twine.  I cut my twine as I went because I was only loosely following the design from the image above.  


Step 6: Trace over your pencil with the hot glue gun, affixing small lengths of the twine at a time.


Step 7: After gluing down all of my twine, I took a moment to trim up any wild strings from the twine and from the hot glue to "clean it up" a bit.
Step 8: Paint the edges of the canvas with a gold or tan to coordinate with the twine (I used gold.)
You have an easy to do piece of art!


Okay, so, I have to say there were some pro's and con's to this project.

Pros: Quick, easy, uses products most crafters already have at home
Cons: Can take patience and care to get a "clean" look

To have a nice clean look (cleaner than mine), I recommend tracing your design on the canvas first.  I also recommend being especially careful to use as little glue as possible as your trace your lines.  Do not use big globs.  You don't want to see the shiny glue after it is completed.  I had like three places I had to pull off and review.  It was kind of a pain to have to do this, but it could have been avoided if I had realized how important it was earlier to not get "globs."

If you modify this idea or have another idea like it, let me know!  I liked this project, but I think it could have turned out better if I had done a few of the recommendations I gave here.


Friday, September 16, 2011

My Household Binder: The Basics

I first heard about a "household binder" about six months ago while reading this blog.  I decided to make one using an old binder and dividers I had sitting in a closet.  I mostly just used A Virtuous Woman's printables at the time.  After seeing this first household notebook, I felt like I saw them everywhere!  It was really handy for me, but I started wanting to "cutesy" mine up a bit and add some elements I hadn't originally included after reading ideas from other bloggers.  So, my household binder has been a sort of work-in-progress.  It has evolved, and most recently, I created several of my own printables that fit my personal taste a little better.  I still would recommend the printables from A Virtuous Woman.  I simply found that eventually I wanted to invest the time to do something a little different.

The basic idea of a household notebook, if you haven't heard of this before, is simply a place to keep the key information and lists you need for your home.  My notebook includes 5 sections: Schedules and To-Do Lists, Budget, Cleaning, Meals, and Important Information.  I put lots of handy information in one place including to-do lists, insurance info, a bill checklist, meal plans, grocery lists, etc.  I am going to break up showing you my binder into a few posts because there is a lot to share.  First, I will just show you what my binder and dividers look like.  We can dig deeper later.

The Front of my Binder, made using Microsoft Word


Labels
The Inside Cover of my Binder, made using Microsoft Word

If you would like to customize these covers, I can send you them as a customizable Word document; however, you will need to download the font to use it.  The font is called Black boys on mopeds.  Yeah, you can't make something like that up, can you?  To download the font, click here.

I'll post more photos from inside my binder soon, but if you want to know more, check out these household binders that I have used for inspiration:

Have a good weekend!


Thursday, September 15, 2011

Thrifty Thursday

As a teacher straight out of college, we aren't exactly rolling in the dough.  I decided to share a few ways I have found to really save money.

Find coupon codes

Before I buy any product online, I check two different sites for any possible coupon codes that have been released for the website I plan to buy from.  Most online retail stores send coupons regularly to store newsletter subscribers, but you don't have to subscribe to every one of these newsletters (which often fill up your e-mail box and go unopened).  Luckily, nearly all coupons are published by generous subscribers.  These coupons are published on coupon code websites.  The two websites that I use most often are www.couponcabin.com and www.retailmenot.com  I really appreciate these websites because they almost always give information about when the coupons expire and if they have been used successfully by other readers.  I can almost always find some sort of coupon for the website I am buying from, and when you do this often, the savings can really add up. 

Shop with a list and a full belly

I know most of you "know" this to be true, but we still fail to actually follow this tried and true tip.  If you shop from a list of things you need and you have a full belly to resist urges to buy things you do not need, you will save so much money.  Stores like Walmart spend millions of dollars designing their stores to attract you to items you do not need and did not plan to buy.  They want you to buy more than you plan, and their designs really do work (I am sure you can think of unplanned purchases that just "popped" out at you in the store.)  If you go in with a focus and a list of everything you need, you can overcome their psychological mind tricks and save $$$, too.

Use coupons thoughtfully

I am not a huge coupon person because I find that most coupons are for items that I don't really need or purchase anyway, but I do think coupons should be used purposefully.  If a coupon is for 50 cents off any size of _______, get the smallest size, especially if it is an item that you might use but wouldn't necessarily buy without a coupon.  Also, you need to remember that companies use coupons to make money.  You should only use coupons for items you use and need and should never lead to you spending more money than you would have otherwise.  For example, I just received a coupon for Kohl's that is for $10 off any purchase.  I love Kohl's, but I also know that there is nothing there I can't live without.  I plan on using the coupon to buy a decorator item or a piece of jewelry or perhaps a tube of lipstick (I recently left my favorite shade in the car and now it is melted and deformed), but I will try to keep as close to that $10 mark as possible.  I don't want to spend money on something I don't really need, but if I can get an absolute steal on an item I would use then heck, I'll do it!

Finally, get thrifty ideas from other bloggers
Here are some sites I have lurked in the last few years to get ideas to save a buck here and there:
DebtFreeAdventure.com: 20 Grocery Hacks to Save Money On Groceries
FrugalDad.com: Money Saving Tips 122 Ways to Trim Your Budget
MoneySavingMom.com: Helping You Be a Better Home Economist
HomeEverAfter.com: Cheap Recipes
I might add some more to this list later.  Most of my bookmarks are on my other computer, but this is a start of some of the places I have been to get ideas!

7446P3KEQTMJ


Wednesday, September 14, 2011

Mission Organization

It's Wednesday, and I am halfway through the week (I refuse to refer to Wednesday as "hump day" because I find it about as hard not to giggle as it would be for a 12 year old boy in my class... too late, I am already laughing a little just thinking about it, oh well.)  I really love Wednesdays lately because I have been going to a Wednesday night Bible study, and my mother-in-law (who I love unlike the stereotype) and one of my best friends are in it.  That being said, I have been on this kick to finally get my house a bit more organized, and part of me wants to stay home and sort things.  Ya, I am one of "those" people!  I will have to let most of my ideas wait until the weekend, but I did accomplish this so far:


I was inspired by a Martha Stewart photo I posted last weekend.  My closet isn't quite as cute (I tried to cut it out of the pics, but this closet has our A/C units and water heater in it.)  Still, it is very functional, and having an easy to access place for these supplies (in our living room) is going to be SO much nicer than the way I had it before doing this.  I had my hammer and hanging supplies and flashlight all in the guest bedroom closet, far away from wherever I ever need them.  This makes so much more sense!

I must walk away from the computer for the sake of productivity, but I will try to update when the weekend comes.  My big weekend project: Paint the front door!

Monday, September 12, 2011

Manic Monday


Yikes!  If you have any precious technology, stay far far away.  At least it has seemed like I am cursed lately.  Last night, I was tediously preparing my lessons for the week, enthralled by the idea that I might get the whole week prepped and not have to stress all week long. 

That's when it happened!  My external harddrive, my precious little passport, simply stopped functioning while I was accessing a file.
My sweet little holder of every important file I own
I thought maybe a simple computer restart would do--no worries... It didn't work.  Then I thought maybe a simple "unplug--wait 30 seconds--plug back in" would do--a little worried... It didn't work.  Then I thought maybe it was my computer because it has always seemed buggy unlike my sweet little passport.  I thought maybe a simple plug it in another computer would do--quite concerned now... It didn't work.  That's when the tears came, and in a flood, they gushed.
This was totally me.
I was tired and ready to go to bed and then this!  I spent the next hour re-prepping the bare minimum for Monday with tears flowing down.  D is so sweet; he spent this entire hour trying to do whatever he could to try to fix the hard drive with no luck.  I finally went to bed, feeling quite down about having to be at school at 6:30 to finish prepping for the day by accessing files I only had on my school computer (and the poor broken passport).  I arrived at school today feeling pretty down, and then... I went to turn on my computer!  Attempt 1: Everything on the screen is zoomed in weird.  I restart.  Attempt 2: Everything seems normal until just after opening the print tab on the files I need copies of, it freezes!  I restart.  Attempt 3: The computer finally turns on and I get my first page printed at 7:05.  Ugh!  Be praying for my passport.  Even after all of the trouble it has caused me, I want it to survive.  I have years of photos that wouldn't fit on my netbook on there.  If I lose those files, I will only have Facebook quality versions of these photos.

Okay so I hope you feel sorry for me and maybe think I am a little ridiculous, too.  I realized by the end of today that, indeed, my life is not completely over (Last night, I was pretty convinced it was!), but I am still bummed.  Hope your Monday was less manic than mine!

Sunday, September 11, 2011

Mmmm...


L and I with our cookie dough
L's Recipe
My Mom and I
                Today, as I mentioned a few days ago, L and I were supposed to get together to bake, but when I mentioned to my sister that I was doing this today, she wanted to be a part of it, too.  Before I knew it, my mom and my sister were joining our party ;).  Don't worry, we didn't mind!  We all had fun putting on cute aprons and mixing  up our different recipes (a.k.a. eating up our different cookie doughs) and, of course, chatting, too.  L and I left with a little bit of each of our cookie recipes!  L brought a recipe that uses wheat flour and applesauce for a healthier version of the traditional chocolate chip cookie, and I brought the oatmeal chocolate chip recipe I mentioned a few days ago.  They were both yummy!  I don't have a copy of her recipe, but you can see mine here: allrecipes.com. 
The Final Product: Both kinds of cookies together